Creative Craft Ideas

What could I make today? What could I do for a creative craft project? Have you ever asked yourself that? I have not. My questions would be more about how much I can get done. What I need to do, is ask what will I will not do today because I am in the habit of biting off more than I can chew. This sends me into a fluster of ridiculous proportions that takes ages to recover from. This in turn wastes lots of precious time.
Nonetheless, creative craft ideas abound. As the old adage goes 'Necessity is the mother of invention.' If you think you need something or if you would like a particular thing just ask yourself if you think you could make one similar. Give it a bit of thought before you say no. If you give yourself the chance you will be surprised with what you come up with. Otherwise get out a bundle of interesting bits and pieces you have stashed away in your sewing or craft bags and boxes. Broken bits of jewellery, handbags, belts, old clothes, buttons, fabric paint, thread etc etc Then get a cuppa and fiddle or do a bit of internet research or read a few craft books or magazines for inspiration and then do a version of what you like there. A VERSION. It will be your own creative vision then and not someone else's.
There are different levels of creative craft projects of course. There are crafts that take years to hone and perfect like basket making, pottery, or book binding etc. There are those that take a little bit of practice and an attentive open creative mind and there are crafts that you could conjure up on the spot depending on your wits.
You can do anything if you put your mind to it. The thing to remember is to first realise that there are no creative craft project police out there. No rights and wrongs and no critics unless you choose to share your results and even then you could be pleasantly surprised. Have you ever heard of this quote from Mark Twain who wrote Huckleberry Finn? 'Dance like no one is watching. Sing like nobody's listening. Live like its heaven's on Earth'. Well, that's what you need to do when it comes to any kind of creativity. Just do it! No permission required.
This week I have a DIY bucket hat on the go. Handmade. I usually use a sewing machine but it takes a lot for me to be in the form for taking out the noisy machine these days. I like slow quiet work at the moment. In fact although there's a part of it that could require a machine I think I will challenge myself to doing it by hand all the way... Watch this space! Ha!
The Handmade DIY Bucket Hat

I like to make things out of old clothes. Recycling is a great way to get rid of your old bits and pieces while saving you money and saving the environment. If you buy clothes second hand from a charity shop for your projects then you help your pocket, the environment and a worthy cause of choice.. A win-win-win situation.
Make Your Own Easy Bucket Hat Pattern

One of my favourite and better craft project ideas has got to be this one when my husband who is a horticulturist ran into bother trying to find a gardening hat to suit his needs. I though about it a bit and realised it could be the best way to keep him in hats that work and hats that fit.
Take an old bucket hat that fits to trace out and if you like you can change the brim to make it slightly more oval, but you don't have to do that at all.
This is easier than it sounds. There are two ways. The first way is to unpick the stitches so you have all the different parts laid out. Then trace each piece onto card, plastic sheeting or paper. Write on each piece what it is and which way is toward the front.
Also mention how many of each piece you need to cut out for your pattern. Write down on each piece also that the 'seam allowance' is included and what width it is. This is simply how far from the edge the stitchig line should be. Since you have traced the pattern onto something else, the stitching holes are not visible any more so in a year down the line you will have no clue unless you guess. This will save a bit of messing about the next time you make one. Remember when you are cutting out that you may need three pieces of breathable lining for the inside such as a bit of a cotton blouse, shirt or pillowcase for example.

Above you see a light coloured material to show better.
The second way is for the brave, stubborn, rushed people like myself... where you simply trace out the pieces and add a seam allowance to your image. Remember to trace as close to the original size and outline as possible of the still attached pieces and know exactly where the stitching line will go. In this case it is easy as the original line around the pieces is the stitching line so it will be there automatically even when you add a 3/4 centimeter seam allowance. The brim will need two pieces of the heavier main material if you want it to be a little stiffer but you can use lining for the under side if you prefer. I always think about a toilet seat then I see the pattern for the brim. A big oval. The centre piece you cut out can be used as the top of the hat. A good idea is to try the brim pattern on whomever the hat is for. It should fit neatly on the head where it will be worn normally. Not too tight and not too lose. It may have lining and stitches to accommodate too. A little too lose is better if you need to choose. Don''t get too hung up on perfection though. Do your best.

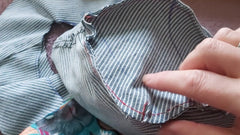
For the sides of the outer hat and the lining start by putting the two sides together front sides together and backset the ends about 3/8 of an inch from the ends as seen above.
Remember it's for personal use so you can camouflage any imperfections. When you draw the extra seam allowance around the edges of all the pieces, again, don't worry if your line is a bit wobbly. It's the stitching line that counts more. Then write the details down on each piece as explained before.
Take Your Old Jeans and 'Fillet' Them
I like to get my material ready before I start so I keep myself organised and on track. First I cut the waist band off close to the stitching line. I try not to cut through the loops but instead cut their threads where they join the jeans just below the waist band. This way I can keep them in the design for later. They will house the hat band.
Cut off the hems of the legs along the seams. Keep all of these pieces and any interesting bits and pieces like leather tags etc

Turn the jeans inside out and lay the biggest pattern piece down length ways from the ankle up. Cut roughly about an inch above this like, you are making a pair of shorts.
Cut the the piece open along the seam as close to the stitching as possible to get as much usable material as you can.

Tip:
When tracing your brim it can be a good idea to place your pattern across a seam. This can be a bit tricky to sew over later especially if you use a machine but it can be worth it for the look.
If your pattern is paper you can pin it in place and cut around it carefully. If it's hard plastic you can trace around it with pen, chalk, marker etc..
Tracing Tip for Bucket Hat Pattern
I usually trace on the front side for pieces that will be on show and then keeping the pattern on the same side I turn the material for the under side of the brim so that I trace the pattern on the back of it. This will make sure the two pieces match shape wise.
If you do this for all the pieces you will have an easier time when it comes to sewing up later on.

Sewing Up Your DIY Bucket Hat
It all gets simpler from here. Believe me..

Place the two outer sides back to back so they match a perfectly as you can make them. When you are sure that they are pinned together securely, trim any extra bits off around the edges.
Now tack across just above or below the stitching line or sew along the stitching directly on both ends of the material using a small back stitch securing the thread as you complete each row of stitches.
Here you see how you line up the marked pieces making it easier to secure in the right place.
Tip: Pin at these points before following with the remainder of the perimeter.
Take the material for the top piece of the outer hat and fold it in half on the length. indicate with a stitch of a different colour thread where the middle is on each edge and do the same on the width. Find the centre of the sides and do the same with the sides just sewn together. This will help you line up the top piece in between the two sides.
Offer the top piece up to the place it will go and pin in place matching up the temporary threads done earlier and work out from there. Make sure the top of the hat will be flat by checking the hat right side out (careful of pins) before you tack in place. Adjust it to get it right. It helps to open this portion of the hat into the hat shape to see if the top part will be flat or if it will be floppy and so cave in.
Take the two pieces of brim and pin back to back. Sew by hand or machine along the stitching line toward the outside of it only. Turn it right side out.
Fold the brim in two length ways to find the middle axis and mark with thread on the inner oval and do the same for the width.
Turn the top piece of the hat right side out and upside down and pin the inner oval edge of the right side/upper side of the brim onto it, by matching the temporary marking threads and stitching lines all the way around. Try your best for it not to pucker. If there is a little too much material on either part then make a neat tuck around the sewing line. Try to match each side with alterations but only if you feel it will not alter the size of the hat.
Tack this in place with contrasting thread, remove pins and try it on the person in question. Make any alterations now.
Sew in back stitch along the stitching line all the way around and secure the threads. Remove all tacking threads.
Sew concentric lines 1/2 cm apart around the brim to strengthen it. This also makes a very attractive detail. This is quicker by machine as you can use the presser foot as a guide and go round in concentric circles but it can be done by hand just the same, if you are not in a rush. I intend to try it by hand this time with the hat I am making for this creative craft idea.
Make the lining of the top part of the hat as for the main outer part minus the brim of course which is finished. Put it inside the hat and turn the edge under before you pin/tack in place. Then neatly top sew in place around the inner edge of the hat.
By now you are probably very happy with yourself as you have a lovely hat which comes together quickly enough when you get the hang of it and quicker again the second time as you already have the hang of it and the pattern if it's for the same size head more or less. You can attach the band now which is the trouser band you cut off earlier. This can be a handy way of making the hat a little more secure in windy conditions if you feel it is a little big. You can attach the band in about six strategic places to secure it. You can use something decorative to do that like a button or a bead or even an embroidery stitch in a contrasting colour. The world is your oyster. it just depends on the wearer and their preferences. Sometimes for a creative craft idea it's nice to change up the lining as a little surprise or add a relevant charm or patch to the outside to personalise it.
Check Out Our New Creative Business Blog Here called 'Niche Business Musings'.
☆
See AmandasParade Latest YouTube Video Here
☆
Join Our Newsletter Here for Special offers and Early Bird Info on New Handmade Stock Arrivals!
☆
Check Out Our Handmade Collections Here!
☆

