Christmas Gift Tags and Tassels
How to make them and what to use them for!

Tassels shout luxury on shoes and bags and other accessories. It's an accepted fact since the dawn of luxury goods. I surmise it's because of the generosity they exude. They are fun and a little excessive. Extra, so to speak. Both men and women are comfortable with them. I mean they don't shout either masculinity or femininity. It's not about that.
There's plenty of thread and in a generous tassel. Much like a pop-pop. A less than full one, looks mean unless it's made of leather or some other rustic and sturdy material. Finally when it comes to colour and texture the world is your oyster.
How to Make Tassels

When we were small my mother used to crochet pure wool shawls for sale. These were really beautiful and massive affairs with tassels all around the edges. I remember helping a bit with these tassels though in retrospect, I suppose I imagine I helped more than I actually did. Hmm. Well, I believe I should get on to the how now!
First let me point out that first there is the simple tassel and then there is the method of attachment. The latter can be more difficult and a little time consuming, as I found out when 'whipping up', a few tassels on chord for my phone holders. (seen above).
There are so many places that you could use a tassel to great effect. They are not just limited to hats although they are really cute on some hats. I'm sure as I list the possibilities I will forget some obvious ones but here goes.
-
Top of Welly Socks
-
Top of a Gift Box
-
End of Jacket Chords
-
Side of a Handbag or Even a Tote.
-
Around a Bottle of Wine
-
On the Front of your Shoes
-
On Top of a Keepsake Box
-
On the Cover of a Journal or a Photo Album
-
On the Chord of a Bookmark
-
As a Tie for Your Handbag
-
On the End of Chords of a Draw String Bag
-
Adornment for Cushions on the Corners for Example
-
Worn as Earrings
-
Tied to your Phone or Glasses Holder
-
Make big ones as Tie Backs for Curtains
There are many more ways to make use of tassels. The list goes on and on..
Tassels are simple really. I will list out the steps to keep them clear.
Equipment needed to make a simple tassel.
-
Coloured thread, wool, chord or string.
-
A scissors.
-
A frame of double the desired length of your tassel.
Steps to make your tassel.
Fiddly but do-able!

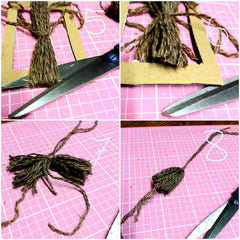

-
Choose your string or thread (embroidery thread) in the colour or colours you would like your tassel to be.
-
Take your thread/string and secure one end to the side of the frame so it won't unravel as you work. Leave enough so that it won't make a short thread in your tassel later when that piece is added in.
-
Wrap your thread/string around the frame as from top to bottom and overlapping the previous layers as you go. You don't have to be too fussy.
-
When you feel your bundle is half the width of your tassel (you will fold half of it down later), tie/secure your thread to the side of the frame and then cut your thread/string to put the remainder away.
-
Take a piece of chord or thread about 6''/15cm long, wrap it a few times around the middle of the bundle and secure it tightly with a knot. This will be your handle or hanging chord.
-
With a fine scissors, cut the threads/string at each end as evenly as possible so that the tassel comes off the frame altogether.
-
Take the tassel and hold it by the string to double it over.
-
Take another piece of the thread/string and bind it well around the top, about 1cm down from the handle/hanging chord and secure with a knot and a bow if you choose.
-
Tidy the bottom of your tassel by trimming any threads peeping below the desired length to make an even finish.
-
TA-DAH! Your tassel is finished!
Variation on How to Make a Tassel
This variation is where you attach a tassel to both ends of a chord to attach to your project for an extra bit of luxury. It is a bit tricky to get a tidy finish.
-
Follow the steps 1-7 above.
-
Cut a piece of chord to attach your tassels to, making sure to cut it 2''/5cm longer than needed.
-
Make a very tight single knot at the very end of each end of the chord.

-
Take one end of the chord and having folded your tassel in two hold it between your finger and thumb securely and hide the knot of your chord tightly up under it.

-
Take a small strong piece of thread and tie tightly around the 'neck' of the tassel taking care to hide the knot behind the threads.

-
When this is done take hold of the main chord and turn the tassel upside-down and smooth the threads so they all fall the same way.

-
Get another nice piece of thread/chord and bind it around the 'neck' of the tassel and when you are happy with how it looks, secure it in place making sure the knot is concealed inside the head of the tassel.

-
Finish as for the simple tassel No 9 step.
-
Repeat for the second tassel on the other end of your chord.
-
If you have done this you should feel very proud!

Now we are on to Christmas Gift Tags

Christmas gift tags and gift tags in general are simple or difficult and elaborate. You choose. Simple often works best. There are easy ways to go about a job and complicated ways to get the same job done. I will give you a few simple steps to get you started..

Gather a few necessary bits and pieces together at the start. You'll be happy later you did. Take a box, bowl, basket or bag and head off around the house in search of things like..
-
Paper or card.
-
Scissors.
-
Scraps of material if you like.
-
Colouring materials such as paint, crayon, pencils, ink, dye, markers.
-
Glue of some sort such as PVA paper glue, glue stick etc If you don't have glue perhaps you have flour in the house. Mix a few teaspoons of flour with a little water in a cup to make a paste like thick yoghurt. This will hold card to paper when it dries to the pieces.
-
Paint brushes.
-
Protective sheet or big sheet of paper for your working surface unless you are fancy and have a special surface for the purpose of crafting.
-
String or thread or chord to tie your tag.
-
Rubber stamps if you have them.
-
Stencils if you have them.
-
Scrap paper to doodle your designs on at first.
-
A ruler or straight sided book.
-
Paper punch to make a neat hole for the thread but it's not crucial.
Steps to Making Christmas Gift Tags

Take a piece of paper and a pencil to write down a few designs or images you might like to consider for your Christmas gift tags. These could be for example, animals, gnomes, snowflakes, baubels, Christmas trees, candles, robins, crackers, deer, snowballs etc.

HINT: Consider what you could reproduce yourself in a drawing easily or what you could readily find in a magazine or from old or new wrapping paper to cut out and use. Baring this in mind, you could cut out a few shapes from the wrapping paper you plan on using to make matching tags. If you don't want to have a picture then a simple stroke of paint in your chosen colour would work, or a swirl, a few dots, a few stripes etc. Literally everything and anything goes.

-
Once you have decided on what design you would like to go with you need to decide on the size of tag you want and cut out as many little rectangles as you want for the gift tags.
-
Cut the top corners of each tag into a v shape and round off the edges (optional)..
-
Make your design using the methods described earlier. If you have cut out designs then stick them on considering the point as the top of the tag.
-
Cut a hole near the point with the punch or carefully with a pencil or scissors.
-
Stick your cut out designs on or swish a stroke of paint onto the tags.
-
Cut out a piece of string twice the length or more of the length you want. Double it over and tie a knot in the two lose ends. Send the curve of string on the opposite end to that knot through the hole from the front and slip the knotted end through it as it comes out the other side and pull.

-
If you like put 'TO ______' and 'FROM_______', on the back of them in caps for you to write your message in later.

There are many ways to make gift tags such as digitally and with images printed on sticker paper etc. You could use a Cricut Machine among other sticker makers, you could do different shapes, sizes, themes, colours, textures etc. This method described above is a simple and economical way to make Christmas Gift Tags or any Gift Tags and for all the family to be able to take part. No fuss or expense but with all the thrills.
CHECK OUT OUR CHRISTMAS COLLECTIONS HERE!
CHECK OUT OUR HANDMADE AND ART CHRISTMAS CARDS HERE!
CHECK OUT OUR QUIRKY GIFT SETS HERE!
JOIN OUR NEWSLETTER FOR TIPS TRICKS AND GREAT OFFERS HERE!

